Ultrasound Leadership Academy: Intro to Musculoskeletal Ultrasound
Michael Macias

By Michael Macias
Welcome to the Ultrasound Leadership Academy (ULA) summary blog series. This week, we discuss the basics of musculoskeletal ultrasound. The ULA is essentially an online advanced ultrasound education experience put on by the team from Ultrasound Podcast which brings cutting edge learning to emergency medicine personnel through a variety of interactive platforms including video lectures, google hangouts with experts, simulation, live conferences and real time scanning with a pocket-sized ultrasound device known as a Vscan.
Over the next year I will be posting summaries of the key learning points from my experience. If you want to learn more about the program you can visit Ultrasound Leadership Academy or Ultrasound Podcast to see more from the hosts of this awesome program.
Introduction
Musculoskeletal complaints in the emergency department are a daily occurrence. From the poor old lady that falls on her hip, to the avid wrestler who popped out his shoulder, to the painful swollen joint, this category is defined by a broad range of diagnoses that you can use ultrasound to assist with. Many studies have shown that for numerous musculoskeletal pathologies, ultrasound is the superior diagnostic option and is even comparable with MRI in terms of diagnostic capability (plus it's much cheaper and less time/resource consuming). Even better, it provides us with dynamic views of what is going on below the skin...whether it is assessing a ligament, performing a reduction of a shoulder, or aspirating a joint, ultrasound is a real time aid to assist with your clinical practice.
The Basics


Anatomy: Understanding the multiple tissue layers in MSK ultrasound may appear daunting, but once you get the basics you should be all set. Your next task, which will ultimately make to a highly skilled MSK ultrasonographer, will be knowing your anatomy well for each scan you perform.
- Left Image: The MSK tissue layers can be divided into superficial and deep portions. The superficial portion consists of the epidermis/dermis and the subcutaneous tissue. The epidermis/dermis will appear as a solid hyperechoic line of varying thickness at the very top of the screen. The subcutaneous tissue is relatively hypoechoic with intermittent lace like stranding. The deep portion consists of muscles, tendons, ligaments, bones and joint spaces. Notice that the muscular fascia, which is a hyperechoic line, separates the superficial from deep portion. Nerves and blood vessels will often run in this area. Muscle appears hyperechoic relative to subcutaneous tissue with striations that run parallel in a particular direction. At the bottom of the image we appreciate bone which is a smooth hyperechoic line with posterior shadowing given its strong reflector properties.
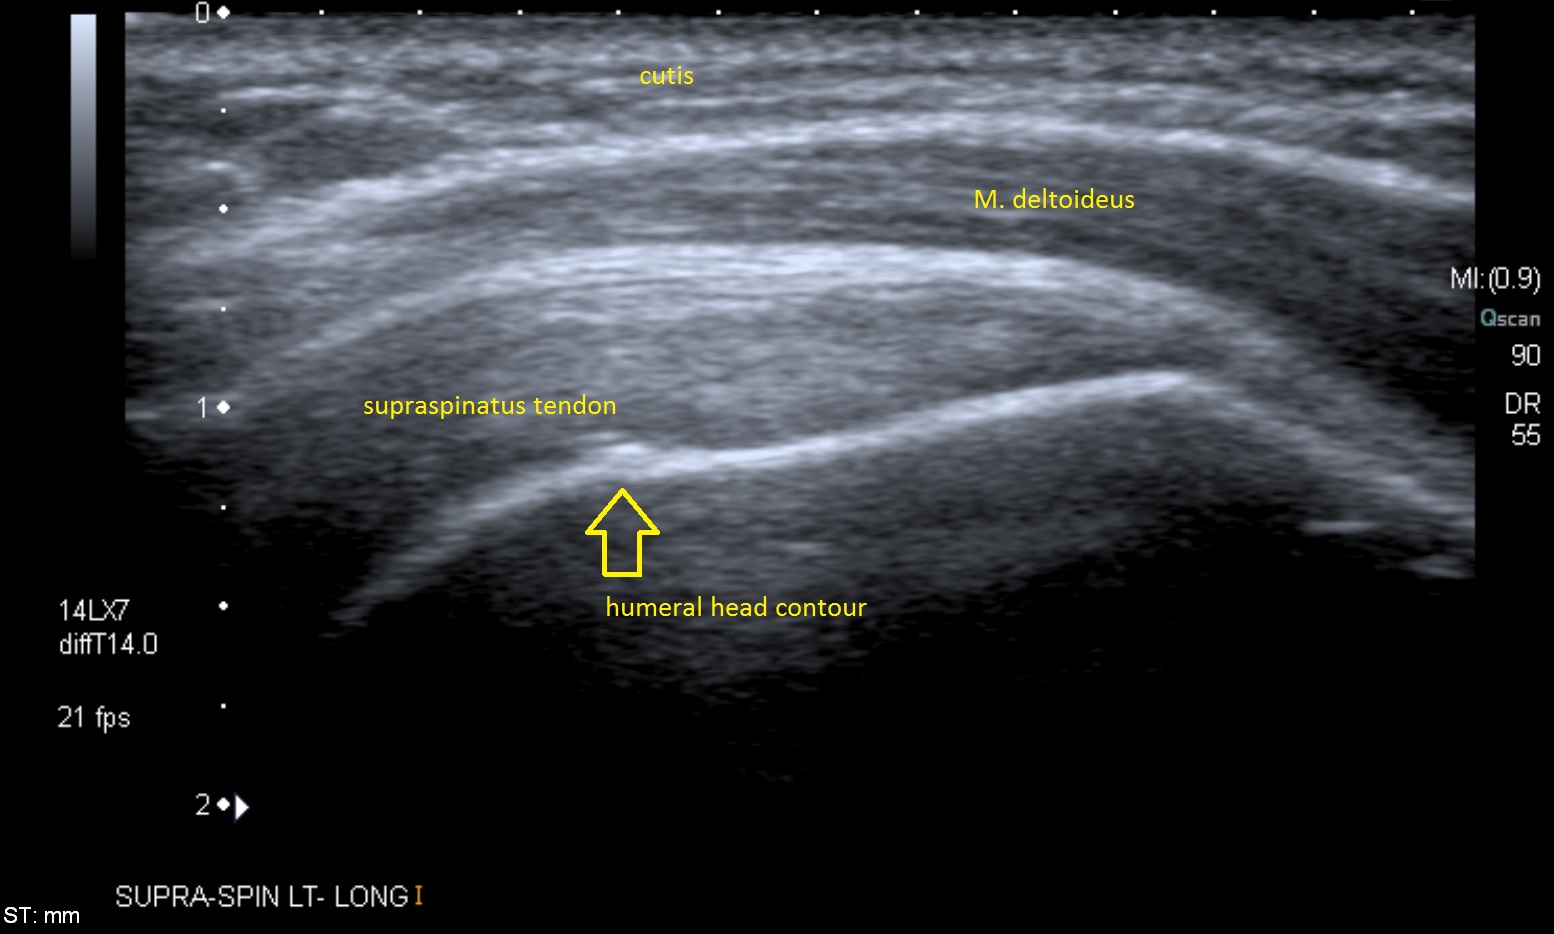
- Middle Image: Tendons will share a similar fibrillar appearance to muscle however given that they are more dense, they will appear more hyperechoic relatively. This is appreciated in the longitudinal view of the supraspinatus tendon seen above.
- Right Image: Nerves take on a unique appearance on ultrasound. Specifically in a transverse plane, their pattern can be described as a honeycomb, which is a direct result of alternating hypoechoic axonal areas and hyperechoic peri-/epineurium, Note the honeycomb appearance in the transverse image of the median nerve seen above.
Probe: The majority of the time you will be using a high-frequency linear probe. This is ideal since most structures will be superficial and you will want high resolution for proper tissue differentiation. You may decide to use the curvilinear probe when evaluating the hip or performing a nerve block in a larger person.
Positioning: This will vary quite significantly depending on what you are scanning. The key is to make sure the patient is in a comfortable position and that you are supporting the extremity you are examining to avoid unnecessary movement and artifact.
Orientation: You may find yourself on the left side or the patient, at the head of the bed, or even at the patient's backside. Regardless of the patient, be sure to keep your probe marker on the same side relative to yourself so you never confuse yourself with orientation. The area of interest can then be systematically assessed in two orthogonal planes.
Compare: Remember that your patients have two of everything. While you may not initially be certain about potential pathology you see, it is helpful to compare your examination to the contralateral side to help with deciding normal versus abnormal.
Dynamic imaging: Musculoskeletal ultrasound should be interactive, allowing you to assess function and procedure efficacy in real time. For example, when assessing for tendon injury you should be ranging the extremity while observing for tendon abnormalities, or monitoring your needle advance into a fracture site for a hematoma block.

Water bath for small part evaluation. From Introduction to Bedside Ultrasound
Small part imaging: You may find it difficult to assess a finger tendon or small joint given the size of the body part, the superficial nature of the structure of interest, or even patient discomfort. The water bath will be your best friend here and will allow for excellent visualization of your anatomy as well as less pain for the patient. You may also try a plentiful quantity of gel, however this can get messy.
Anisotropy: This is a key concept to understand in MSK ultrasound. Anisotropy translates to mean "directionally dependent" and is a result of the fibrillar nature of structures such as tendons and nerves (and to a lesser extent muscle). This quality leads to the ultrasound image varying depending on the angle between the structure of interest and the ultrasound beam (also known as the angle of insonation). For example, when the angle of insonation is perpendicular to a tendon, the tendon appear bright and normal, however as the angle varies, the tendon can take on a hypoechoic appearance. Do not be fooled by this when evaluating for a tear, as you may just be appreciating this phenomenon. However if you do notice that a muscle or tendon does not display the property of anisotropy, this can be a sign of underlying muscle or tendon pathology.
Where do I scan? This is usually fairly easy, simply ask the patient where it hurts and have them point to that spot with one finger. If you start here, you will find the pathology the majority of the time without issue.
We will delve into more pathology at a later time, but before you do, make sure to have the basic anatomy down and understand the core concepts of MSK US that we discussed. A few resources I recommend to learn more:
- Musculoskeletal Ultrasound: Muscles & Tendons AEUS
- Soft Tissue US in 5 min 5 Min Sono
- POCUS for Necrotizing Fasciitis The EDE Blog
- Ultrasound of Radius Fracture Ultrasound Podcast
- Hip Ultrasound, Aspiration & Injection Ultrasound Podcast
THAT'S IT FOR THIS WEEK
If you are interested in learning more about the ULA learning experience, visit their website below:

More on MSK ultrasound can be found in "Introduction to Bedside Ultrasound," Volume 1 & 2, from Dr. Mallin and Dr. Dawson. If you are interested in purchasing these ebooks for less than $1, visit Ultrasound Podcast Consumables.


