Ultrasound Leadership Academy: Introduction to Procedural Ultrasound
Michael Macias

Welcome to the Ultrasound Leadership Academy (ULA) summary blog series. This week, we discuss concepts in procedural ultrasound. The ULA is essentially an online advanced ultrasound education experience put on by the team from Ultrasound Podcast which brings cutting edge learning to emergency medicine personnel through a variety of interactive platforms including video lectures, google hangouts with experts, simulation, live conferences and real time scanning with a pocket-sized ultrasound device known as a Vscan.
Over the next year I will be posting summaries of the key learning points from my experience. If you want to learn more about the program you can visit Ultrasound Leadership Academy or Ultrasound Podcast to see more from the hosts of this awesome program.
Introduction
The literature regarding ultrasound guidance for procedures is robust enough at this point to be incorporating it into most of your routine emergency medicine procedures. From central line placement, to peripheral vein cannulation, to pericardiocentesis, it has essentially become standard of care.
CORD Curriculum for Procedural Ultrasound From ULA 'Introduction to Procedures'
Initially, procedural ultrasound may seem to be quite a daunting task, given the Smörgåsbord of procedures we routinely perform. However it may be easier to think of ultrasound guidance as a concept, rather than separating it out into individual procedures. Once you are able to understand the concept and capture the proper general technique, it will be merely application from here.
The Basics
What you need
- Linear (high frequency) Probe: This will be your probe of choice for the majority of procedures such as central line placement and nerve blocks for optimal tissue resolution.
- Curvilinear Probe: For procedures that involve longer distances from skin to target, a probe with higher penetration will be useful such as during paracentesis, thoracentesis, lumbar puncture and hip arthrocentesis.
Preparation for sterility
Transducer with Tegaderm Cover. From ULA 'Introduction to Procedures'
- If you are injecting for nerve block or performing arthrocentesis, you may not need full prep (technique may vary), so consider sterile gloves and a sterile transducer cover as seen above. Note no gel is required between the tegaderm and probe interface. Use sterile gel such as surgilube to maintain sterile field.
- If you are leaving something behind (i.e a catheter), then consider full sterile prep including drape, gown, gloves, hat, mask and sterile probe sheath. It is useful to have an assistant to hand you the probe to place the sterile sheath, however you can place the sheath solo as seen above.
Tip: Remember to use a hemostat to tack down the probe sheath tail to your sterile field to prevent it from sliding off.
Hemostat clipping probe sheath to surgical drape. From ULA 'Introduction to Procedures'
Direction & MacHINE POSITIONING
- Always have the ultrasound directional indicator towards the operators left. Procedural ultrasound is always about the operator and therefore you want to always know exactly what you are doing and not worry about getting disoriented.
- The ultrasound machine should be placed on the opposite side of bed from where the procedure will be performed. This allows you to visualize your procedure and ultrasound screen simultaneously and avoid head turning which can skew your view and lead to unnecessary hand movements.
GUIDANCE
There are two different ways you may use ultrasound for your procedures. I suggest practicing all procedures initially with dynamic guidance to sharpen your dexterity.
Static guidance: This involves using ultrasound prior to your procedure to identify pertinent landmarks and mark the skin appropriately. Skin can then be prepped and procedure performed without further use of the ultrasound.
- Good for: Large area or target that does not move with respiratory variation or contain any high risk structures
- Procedures: Thoracentesis, paracentesis, lumbar puncture, arthrocentesis
Dynamic guidance: This involves sterile prep and use of ultrasound throughout the procedure.
- Good for: Small targets or monitoring ongoing changes within tissue such as anesthetic injection or guidance of needle into vascular structure.
- Procedures: Central line placement, nerve block, pericardiocentesis, arterial line placement, PIV placement
Training
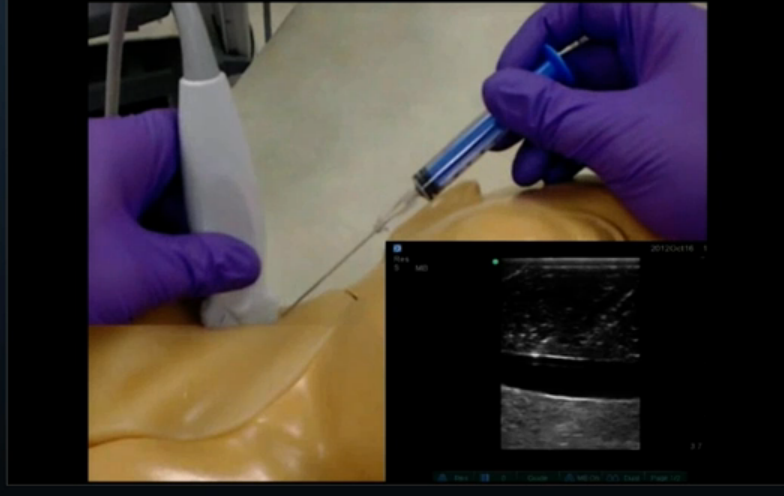
Gelatin model for ultrasound guided venous cannulation.
Ultrasound guidance for procedures is difficult to learn on patients as it not only takes time, but it also takes trial and error. Working with "phantom" models is the best way to develop the mechanics and muscle memory necessary for these intricate procedures. There are expensive models available for training but simple grocery store models are also very useful. Consider using meats such as turkey, or substances such as tofu or gelatin, with implanted foreign bodies, and work on hitting these targets with a needle under ultrasound guidance. You can find an excellent article on procedural ultrasound models here.
DYNAMIC GUIDANCE
Lets go over some terminology before we move any further. When you are performing dynamic ultrasound guidance for a procedure you will often use different words to describe what you are doing. Let imagine we are attempting to cannulate a peripheral vein. Ask yourself two questions:
Question 1: Is the vein (structure of interest) being viewed in the short axis or long axis? In the two images below, note that axis refers solely to your target and how you are cutting it with the ultrasound beam. There is also an oblique axis, which refers to a view that lies somewhere in between short and long.


Question 2: Will you be visualizing your needle along its entire path to the vein you are cannulating (in-plane) or will you be merely slicing through your needle path as you head towards the vein (out-of-plane)? In the image below, notice in-plane technique involves your needle being parallel and directly under the probe, allowing visualization along its entire path. Orthogonally, the out-of-plane technique involves your needle being perpendicular to your probe, allowing visualization of only a few millimeters of your needle at a time. Hence these terms refer to how your needle is moving with respect to the transducer.
In plane versus out of plane technique. From The International Journal of Shoulder Surgery.
With regards to our vein cannulation, it may appear that the terms short axis/out-of-plane and long axis/in-plane terms could be used interchangeably and the same technique would be used. However I hope that the above two questions have helped you to separate these two concepts in your mind. For example:
Imagine you are performing an ulnar nerve block (just imagine peripheral nerve in general if you have never performed this procedure before). You want to be able to visualize the nerve as well the area around it but at the same time visualize your needle as you enter the skin. You may therefore place your probe along the short axis of the ulnar nerve (it will look like a dot on your screen) and then use in-plane technique to visualize your needle the entire way to successful block.
Out of plane Technique
The main issue with this technique is that you do not visualize your entire needle well. You often do not always directly follow your needle tip and use surrogates such as tissue deformation to represent needle end, yet this is not clear and reliable. This leads to the risk of passing a needle too posterior and potentially harming deeper structures.
However out-of-plane technique is still very useful when the distance from skin to target is minimal and you are in areas where there is not high-value surrounding real estate. In areas such as the chest, neck and abdomen where passing the needle too deep can have serious consequences, in-plane may be preferred.
Procedures: Peripheral IV placement, arterial line placement, internal jugular central line placement (though in-plane is safer), some nerve blocks, some arthrocentesis
Leading the Needle Technique. Click image to enlarge.
One technique to avoid passing the needle too posteriorly is called "leading the needle". Imagine you are placing a peripheral venous cannula. Your probe is in short axis orientation and your vein of interest appears as a circle in the middle of your screen. You are performing out-of-plane technique since your needle will be perpendicular to the probe (parallel to vessel).
- Insert your needle at a steep angle just proximal (closer to you) to your probe and advance until you see your needle tip (hyperechoic dot).
- Slide probe away from needle until needle tip disappears ( a few millimeters)
- Then insert the needle further with same trajectory until needle tip is once again visualized
- This is repeated all the way down into the vessel to prevent the needle from passing too deep
In plane technique
In-plane technique allows you full visualization of your needle from skin to target and ultimately the best control of the procedure at hand. Initially it does require more coordinated bimanual dexterity. As you can imagine the ultrasound beam is only several millimeters thick so deviating from a straight line with the needle (or moving your probe slightly) can quickly send you off screen. A few tips to remember when performing in-plane technique:
Non-dominant hand holds probe low, using 4th and/or 5th finger for stabilization against patient. From Jason Nomura at Takeokun.com.
- Your non-dominant hand position is critical for a smooth procedure. Holding the probe low, towards the end, and stabilizing with your 4th and/or 5th digit will avoid unnecessary movements from this hand.
- If you lose track of your needle, attempt to find it by fanning your ultrasound back and forth to locate the needle without moving the needle tip. This is better than cutting surrounding tissues by moving your needle to meet your ultrasound beam.
Manual beam steering. Ultrasound image from ULA 'Procedures In-plane.'
- You can increase the signal from your needle (it will appear brighter) by performing manual beam steering. This technique involves tilting the probe over the area of interest to make the ultrasound beams approach being perpendicular to the needle and increasing signal as seen above.

- You can choose to perform in-plane technique in two ways:
- In-plane and transducer parallel: Here the transducer is parallel to your visual axis, your dominant hand is pointing away from you and towards your ultrasound screen (assuming you have it on other side of bed as discussed earlier). This technique can make it difficult to keep your needle in-plane.
- In-plane and transducer perpendicular: Here the transducer is perpendicular to your visual axis, your dominant hand is approaching the transducer from the right or left depending on your hand dominance. This is usually a preferred technique as it allows better control of your needle.
- Initially, it may be difficult to visualize your needle in-plane. One technique you may find useful is known as the "Ski Lift" which involves manual beam steering as discussed above. This technique is described by Jason Nomura, at Takeokun.com, I suggest you watch his brief video here.
Once you have begun to harness the concepts and muscle coordination for procedural ultrasound, you will now have the ability to perform a majority of the procedures you with a greater degree of safety and confidence. Practice makes perfect when it comes to procedural ultrasound.
THAT'S IT FOR THIS WEEK
If you are interested in learning more about the ULA learning experience, visit their website below:

More on procedural US can be found in "Introduction to Bedside Ultrasound," Volume 1 & 2, from Dr. Mallin and Dr. Dawson. If you are interested in purchasing these ebooks for less than $1, visit Ultrasound Podcast Consumables.
Previous Posts


References:
- Ultrasound Leadership Academy Online Course
- Takeokun.com